
I had a board member from the Rockport Center for the Arts come up to me during a show in which I had one of my paintings. She said, "Larry, how in the world do you do all those details?" I remember being a bit speechless, and said something lame like, "Very tricky thing, those details."
I'm not sure what people expect to hear when they ask that. I think they are just being nice. There isn't a good quick answer to that question. Maybe I should have said something like, "A lot of hard work!"
I'm sure she really didn't want me to take the rest of the evening standing with her in front of my painting and actually tell her. Doing details takes patience and planning. Artists come in a wide variety of personalities. While some are willing to slave away for weeks on a piece in order to achieve a certain level of detail that they love.
Other artists might achieve something they love in a single brush stroke. They may or may not have patience and an ability to plan. The "single stroke" artist might only be choosing not to use those skills, yet use them in other areas.
Other artists might achieve something they love in a single brush stroke. They may or may not have patience and an ability to plan. The "single stroke" artist might only be choosing not to use those skills, yet use them in other areas.
So, you can't draw any conclusions about artist's abilities in this regard. But, I will say that "patient" artists are the ones painting a lot of detail.
The funny thing is, I don't consider myself an artist that goes crazy about perfection in my details. I've mentioned this before. I do just enough for the viewer's eye-brain functions to make up the difference. I know I could spend many, many more hours getting every little brush stroke perfect. I could use a very small, fine brush and paint in every word on every little sign in the backgrounds. I think it a waste of my time and non necessary.
In this post, I am painting some details on the painting I have been working on. I have brought the water up from the bottom; and brought sky reflections down from the top. If you missed it, read my post titled, "The Wet Look," which will bring you up-to-date.
PLANNING SKILLS
I have several details to show you that fall into "planning skills." Not everyone is a "planner." No everyone knows they are not a planner if they are missing those skills. But, you "planners" know who you are. You are constantly talking to yourself about why another person can't or won't "plan." You know for a fact that if they planned better their lives would be much better.
Yep, but I hope you don't verbalize this too much to them, because it will get you nowhere with the "non-planner."
Yep, but I hope you don't verbalize this too much to them, because it will get you nowhere with the "non-planner."
Planning can happen as you go. I knew as I went along with the first round of painting this piece that there were things I would come back to later after everything was dry. Now, it is time to do just that.
POLES
(and I don't mean people from Poland)
This particular detail of poles runs across the whole painting. In my mind, it is a compositional element of detail that helps tie the painting together horizontally, both in design and in color.
I'm talking about the poles standing up in the "party" fishing boats, those boats that take out a large group of people out into the Gulf to fish the reefs. The boat mates use these poles for various reasons, helping the fishermen with lines, etc.
I think the poles create a rhythmic element to the composition, but they were a bit lost in the photos. I thought I could bring them out by painting them in a golden brown, almost like varnished cane poles.
I think the poles create a rhythmic element to the composition, but they were a bit lost in the photos. I thought I could bring them out by painting them in a golden brown, almost like varnished cane poles.
One reason I waited to paint them brown is that they cross over so many details that are painted grey. It was a lot easier to have them match those colors, differentiating them with value (dark and light) instead of color. If I had painted them brown, that wet color would have been picked up numerous times in the paint I was placing next to, in front of, and behind the poles. So, I waited for them to dry, which now makes it easy to go back over them with a different color.
Here is how they looked before I painted them brown.

and here they are painted brown. See how they give life to the boat? I don't care what color they are supposed to be. They look good brown. King's X.....Artist's license!

Here's a closeup of the pole. It took three brush strokes of different colors to make this. There is a light brown highlight on the left side, a pure brown (Burnt Siena) in the middle, and a stroke of dark grown (Van Dyke Brown) on the right side for the shadow. There are twenty of these across the painting. Everything is dry in these areas, so I can rest my hand on the canvas to steady it in order to make these long lines without screwing them up.
The original photo shows black tops to all these poles, so I will go back and add these once I'm done.

If you are wondering how I get these nice lines, here is a photo that illustrates why I use a number two flat nylon brush. If you just let the paint flow off this sharp edge without pushing too hard, you get a fairly consistent line.

You can see the thin edge of the brush loaded with paint. Unlike "round" brushes, this one will give a fairly consistent line. You do have to often flatten it out on the palette each time you pick up more paint. Your eye has to be right there looking at exactly where it is moving.....and your hand had to be steady. Easier said than done, but it gets better with practice.

You can see the thin edge of the brush loaded with paint. Unlike "round" brushes, this one will give a fairly consistent line. You do have to often flatten it out on the palette each time you pick up more paint. Your eye has to be right there looking at exactly where it is moving.....and your hand had to be steady. Easier said than done, but it gets better with practice.
Here are the grey poles on the Pelican.

Now, here they are painted brown.

In this case, my plan worked out very well. I like that the brown poles act as little warm lines amongst all that cool (bluish) boat color. In fact, it sorta picks up a little of that background landscape color in this view.
THE POLE LIGHT
There is another detail I planned for. The street light on the center pole.

This is a closeup the top of the pole without the light. There was no light in the original photo and I thought it needed one. You can see here how I painted the pole itself with brush strokes going from light to dark to give it depth. You can also see the tip of one of the boat's aluminum poles in the lower right corner of this photo. I will come back and touch up these ends when I touch up the sky. Planning...
Here's the whole pole without a light.

Here's the pole with the light painted in.

I just made this light up as I painted it in, but I had it in my head. I wanted an "old-fashioned" lamp look. There are numerous poles in this scene and this tallest, center pole needed something to stop taking your eye up and away from the main subjects!
Putting this element on the pole stops your eye and sends it back down towards the boats. It points back into the composition in the same direction as the boats point.

Since the light on the pole wasn't in the original photo it wasn't traced to locate it. So, I had to remember to put the reflection in the water..... before I forgot about it.
After I took care of the things I had planned for, I started on the rest of the details from left to right. Anything that I ran across that I thought might need a little touchup or definition. Also, looking for any small areas of raw canvas that I may have missed. I found several.
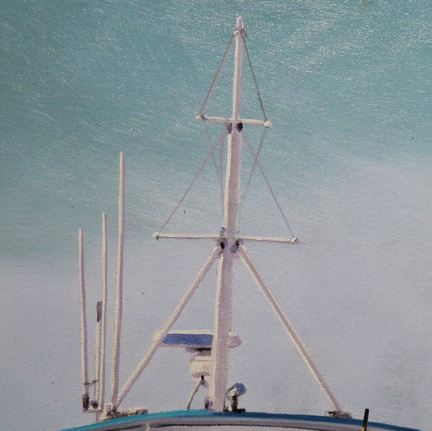
Above is the mast section of the Gulf Eagle. All these boats have fairly thin antenni on top. I always make these thicker than they really are so that they show up in the painting. I also rarely put in any thin cables since they don't show up well. I did put in a few in the above rigging though.
The shadows on these white objects have a lot of violet in them. Violet and purple are colors that many artists are afraid to use, yet they are in nature if we look close enough, particularly in the shadows. I often add violet to blue for shadows. Its a very old trick.

Here is my palette I have been working with on the details. Artists can get crazy over what colors to include in their palette. If I know I will be mixing a large variety of colors, like I needed for touching up details, I will go ahead and place many colors on my palette. j
If I know I am only going to work on a certain area of color, then I will confine my palette to only those colors. I can always add a color or two while I am working, which I often do.
What amazes me is the amount of White I use. A large tube of Winton's Soft Mixing White weighs 6.75 ounces. This eight foot painting has close to two full tubes of white on it. The white paint is also the last to want to dry. Because it is not as opaque as it could be, I have to go over the pure white areas several times. If i do this at the end of my painting, I may have to wait four or five weeks for it to dry, depending on the thickness.

I am happy to say that I am about to complete this painting. I started it at the beginning of January and this is the end of March. I will finish this painting in my next post by putting in the rest of the water reflections, touching up the sky and painting on my signature.
I leave you with a photo I took this morning in my back yard.....the beach. I was sitting out in my lawn chair enjoying the tranquil sunrise as a thunderstorm rumbled to the East. The edge of the storm made some nice reflections where the sun hit it.
Life is good on the Central Pacific Coast of Costa Rica!
No comments:
Post a Comment